

How to Use the Outline Note-Taking Method: A Complete Example

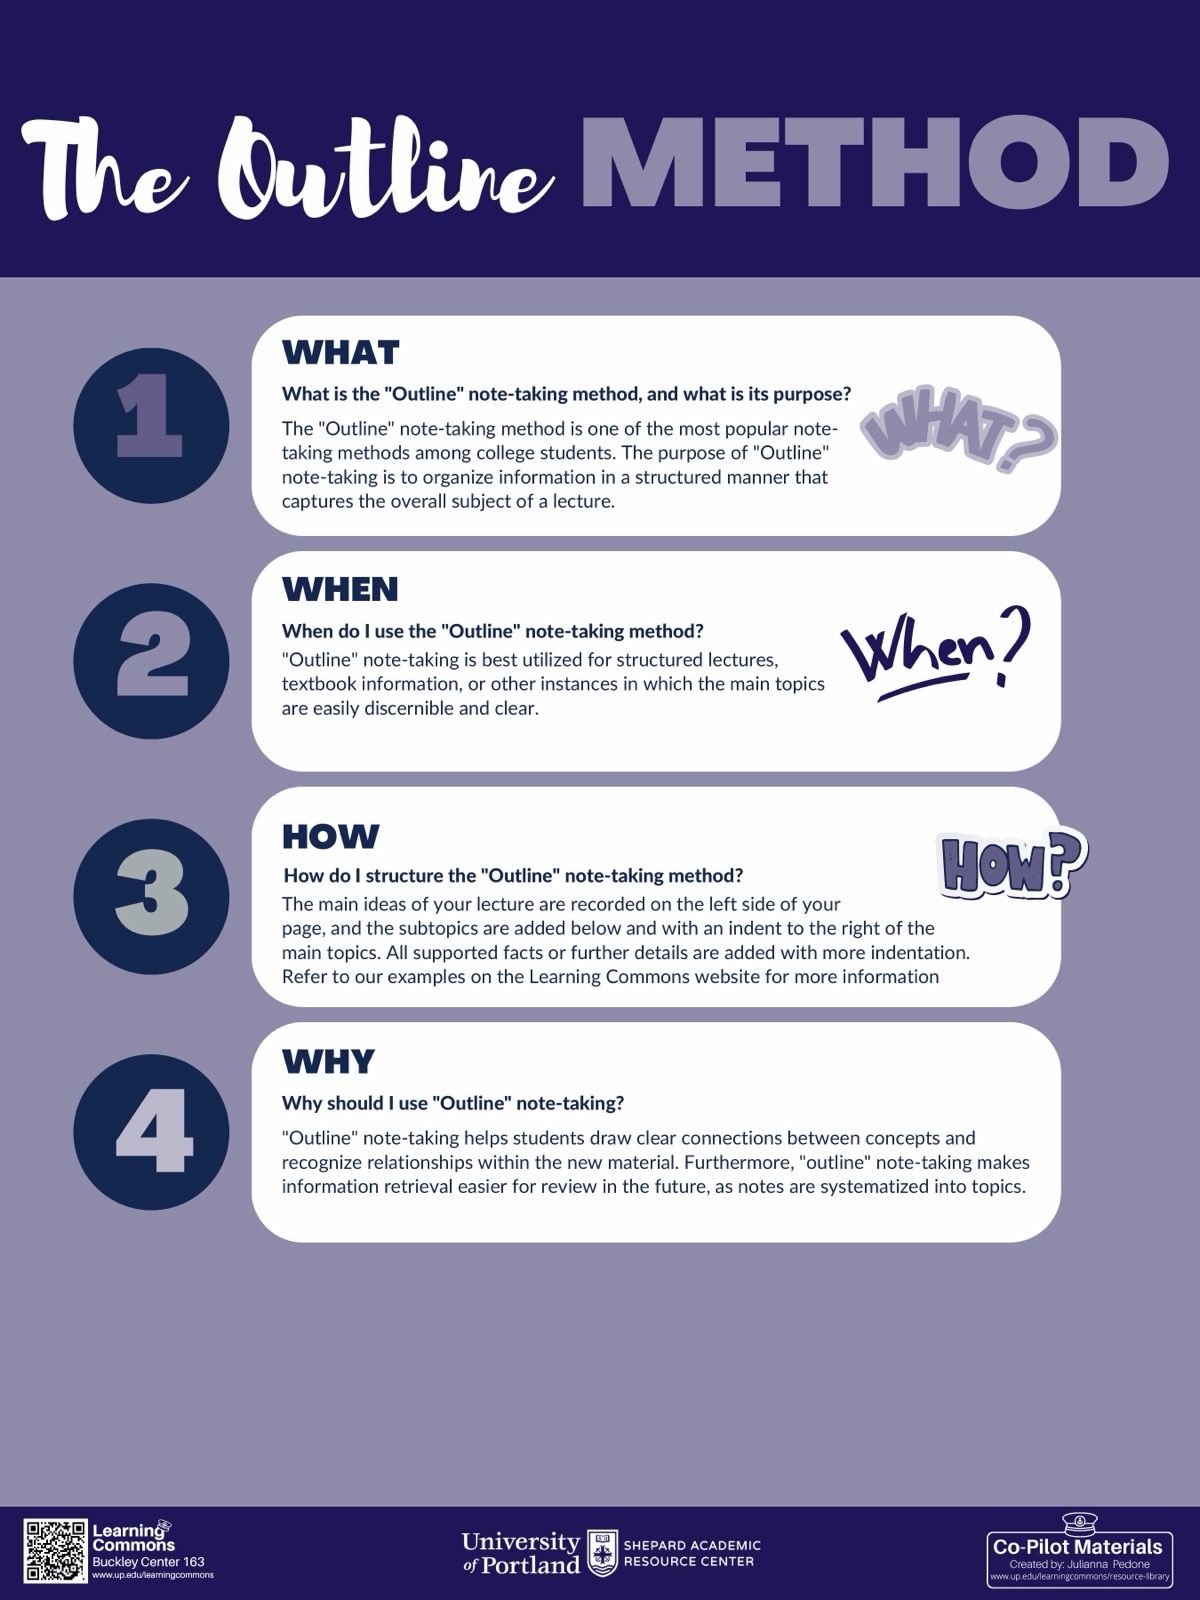
The outline method in note taking organizes information as a visible hierarchy. Main topics begin at the left margin, subtopics sit beneath them, and supporting facts, definitions, and examples move farther to the right.
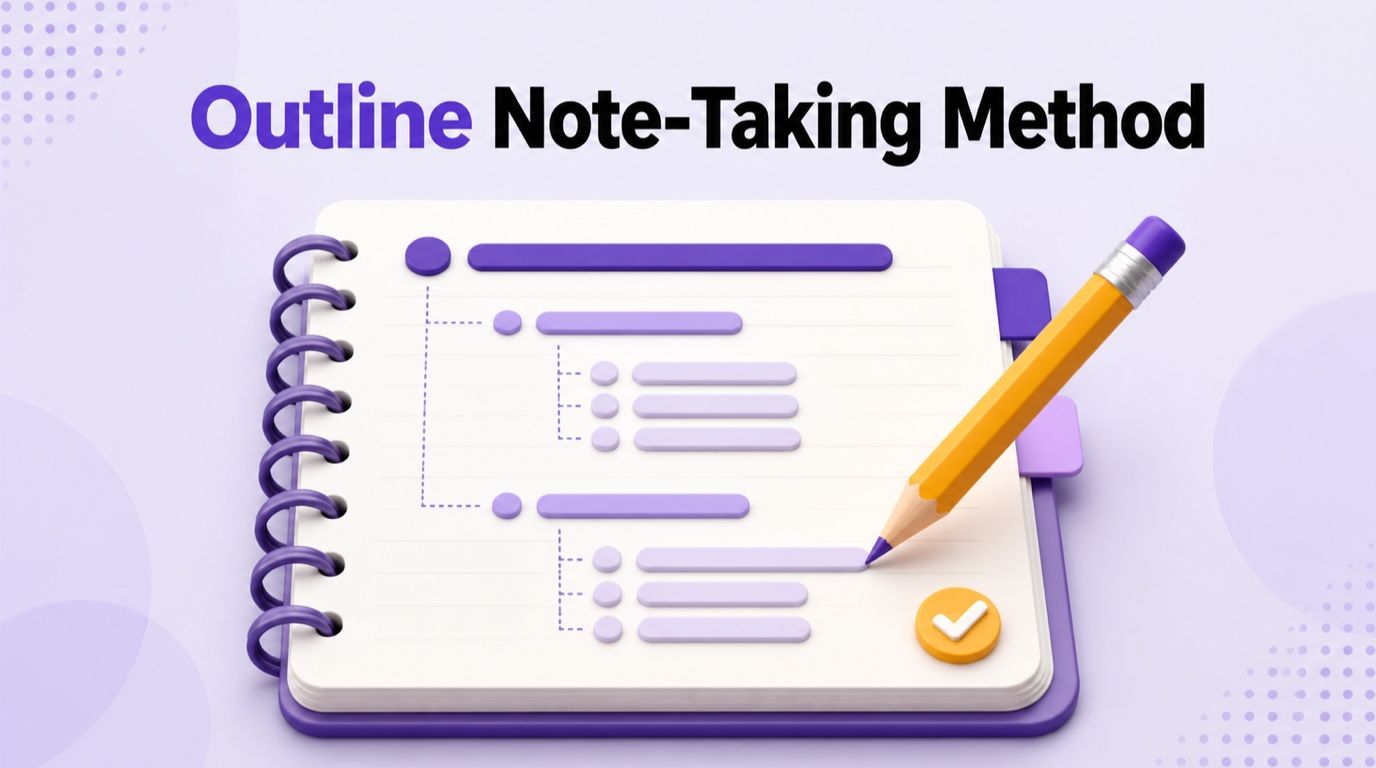
That simple rule makes a lecture or reading easier to scan, but indentation alone does not produce useful notes. You still have to decide which ideas are important, show how details depend on larger ideas, and review the finished outline actively rather than merely rereading it.
What Is the Outline Method in Note Taking?
The outline note-taking method is a linear system that arranges information from general to specific. Each indented line should explain, divide, support, qualify, or illustrate the line directly above it.
Here is the basic shape:
- Main topic
- Subtopic
- Supporting point
- Definition, evidence, or example
- Supporting point
- Subtopic
You can use bullets, numbers, Roman numerals, letters, tabs, or simple spacing. The notation is optional; the parent-child relationship between ideas is what makes the notes an outline.
An outline for note taking is also different from an essay outline. An essay outline plans an argument before drafting, while outline notes capture and organize information from a lecture, reading, video, or meeting. A transcript with every sentence converted into a bullet is not an outline because it records sequence without identifying hierarchy.
If your source is a long document, recording, video, image, webpage, or YouTube lesson, Lynote AI Note Generator can create an editable structured-note draft before you refine the hierarchy yourself. The method still requires judgment: a generated heading is only useful if it accurately groups the details beneath it.
The Four Levels of a Useful Outline
Most outline notes need only three or four levels. Using too many levels makes the page difficult to scan and often signals that you are recording unnecessary detail.
| Level | Role | Question It Answers | Example |
|---|---|---|---|
| Main topic | Names a major section of the source | What broad idea are we discussing? | Types of Reinforcement |
| Subtopic | Divides the main topic into components | Which type, stage, cause, or category? | Positive Reinforcement |
| Supporting point | Explains the subtopic | What does it mean or how does it work? | Adds a desirable consequence to increase behavior |
| Detail or example | Supplies evidence, a definition, or an illustration | What proves or demonstrates the point? | Praise after participation makes participation more likely |
Use four quick tests when you are unsure where a line belongs:
- Heading test: A line that could introduce a whole section is probably a main topic.
- Division test: A line naming one type, stage, reason, or component is probably a subtopic.
- Support test: A line that explains or qualifies the line above should sit one level deeper.
- Dependency test: A line that still makes sense without its parent may belong farther left or under a different branch.
Indentation should communicate dependence, not importance alone. A striking example may be memorable, but it remains a detail if its purpose is to illustrate a broader concept.
How to Take Outline Notes Step by Step
The cleanest outline is usually produced in two stages: provisional capture and deliberate repair. Expecting a finished hierarchy during a live lecture creates unnecessary pressure and can make you miss the next idea.
Step 1. Preview the Structure Before You Start
Scan the lecture title, learning objectives, slide headings, chapter contents, or article subheadings. Write likely main topics lightly or create empty digital headings, but leave room for the source to organize the subject differently.
For a reading, previewing is straightforward because you can see the structure in advance. For a live lecture without slides, treat the title as the first provisional topic and listen for signposts such as “three causes,” “the next stage,” or “in contrast.”
Step 2. Write the Topic and Date
Put the course, source, topic, and date at the top. This small amount of context matters when several lectures use similar terms or when you later combine notes from a textbook and a class.
A useful title is specific. “Biology Notes” will not help much later, while “Cellular Respiration: Glycolysis and the Citric Acid Cycle” identifies the scope immediately.
Step 3. Capture Main Ideas at the Left Margin
Start a new line at the left margin whenever the speaker or author moves to a genuinely new major topic. Use short phrases that preserve meaning, not isolated keywords that will become mysterious next week.
Do not promote every emphasized sentence to the top level. Ask whether it begins a new section or supports the current one.
Step 4. Indent Only When a Point Depends on the Line Above
Move right when a new point explains, divides, or illustrates its parent. Keep sibling ideas at the same indentation level so the reader can see that they perform the same structural role.
For example, “Glycolysis” and “Citric Acid Cycle” can be sibling subtopics under “Stages of Cellular Respiration.” The location and outputs of glycolysis belong beneath glycolysis, not beside it.
Step 5. Use Short Phrases, Symbols, and Placeholders
Capture complete ideas without writing every sentence in full. Use familiar abbreviations, arrows for cause and effect, versus signs for contrast, and question marks for information that needs checking.
Avoid compressing so aggressively that the notes lose meaning. “ATP ↑” may work if the surrounding branch identifies the process and cause; by itself, it is too vague to support later study.
Step 6. Mark Unclear Hierarchy Instead of Stopping
When a lecturer changes direction or introduces a detail before naming its category, place the point at a temporary level and mark it with ?, → move, or a digital comment. Continue listening rather than spending the next minute redrawing the page.
On paper, leave a blank line between major branches and reserve a narrow margin for corrections. In a digital outliner, use temporary bullets and reorganize them with drag-and-drop after the structure becomes clear.
Step 7. Repair and Compress the Outline Soon Afterward
Review the notes while the source is still fresh. Move misplaced points, replace vague headings, complete unfinished phrases, remove repetition, and add any diagram or example needed to understand the branch.
Then compress the outline. If three bullets say nearly the same thing, merge them; if one heading has no meaningful children, it may not need to be a heading at all.
Worked Example: From Raw Lecture Statements to Outline Notes
Consider an illustrative psychology lecture about operant conditioning. The wording below is invented to demonstrate the method, but the four consequence categories are presented accurately.
The Raw Lecture Material
The lecturer explains that consequences can increase or decrease behavior. “Positive” means adding a consequence, while “negative” means removing one; “reinforcement” increases behavior, and “punishment” decreases it. The lecturer then gives examples involving praise, headache medicine, extra chores, and loss of privileges.
A student who writes every sentence in order may capture the facts but miss the organizing grid. The stronger move is to identify “effect on behavior” and “added versus removed consequence” as the dimensions separating the four categories.
From First Pass to Clean Outline
| Raw Statement | First-Pass Capture | Final Placement |
|---|---|---|
| Consequences can increase or decrease behavior. | Consequences affect behavior | Operant Conditioning > Consequences |
| Positive means something is added. | Positive = add | Consequence Terms > Positive |
| Praise makes participation more likely. | Praise -> participate more | Reinforcement > Positive Reinforcement > Example |
| Taking medicine removes a headache and increases medicine-taking. | Remove headache -> medicine use ↑ | Reinforcement > Negative Reinforcement > Example |
| Extra chores reduce rule-breaking. | Add chores -> rule-breaking ↓ | Punishment > Positive Punishment > Example |
| Losing game privileges reduces rule-breaking. | Remove privilege -> rule-breaking ↓ | Punishment > Negative Punishment > Example |
The Cleaned Study Outline
- Operant Conditioning
- Two questions classify a consequence
- Is something added or removed?
- Does the target behavior increase or decrease?
- Reinforcement: behavior increases
- Positive reinforcement: desirable consequence added
- Example: praise after participation → participation becomes more likely
- Negative reinforcement: unpleasant condition removed
- Example: medicine removes headache → medicine-taking becomes more likely
- Positive reinforcement: desirable consequence added
- Punishment: behavior decreases
- Positive punishment: unpleasant consequence added
- Example: extra chores after rule-breaking → rule-breaking becomes less likely
- Negative punishment: desirable consequence removed
- Example: game privileges removed → rule-breaking becomes less likely
- Positive punishment: unpleasant consequence added
- Two questions classify a consequence
The top level names the subject, the second level supplies its organizing logic, and the next branches divide the concept by behavioral effect. Definitions and examples sit under the category they explain, so a reader can collapse the details and still understand the framework.
Benefits of the Outline Method in Education
The strongest benefits of outline education are organizational. The format helps learners see which facts are central, which are subordinate, and where one explanation ends and another begins.
It Makes Relationships Visible
Indentation shows that a definition, cause, stage, or example belongs to a particular parent. This is clearer than a flat list in which every statement appears equally important and unrelated.
It Encourages Selective Capture
To create a hierarchy, you must decide what the speaker is doing with each point. That decision can discourage verbatim transcription and preserve attention for meaning, provided you use short phrases instead of polishing every line during capture.
It Makes Information Easier to Find
Major headings act as navigational landmarks. During review, you can locate one process or concept without rereading an entire page of chronological notes.
It Exposes Gaps and Repetition
A heading with no explanation is an obvious gap. Two branches with the same details may reveal repetition, while an orphaned bullet often signals that its relationship to the topic remains unclear.
It Supports Multiple Study Outputs
Top-level headings can become a summary, subheadings can become study-guide sections, and supporting points can become recall questions or flashcards. The hierarchy creates raw material for study, but it does not perform the study for you.
An organized page does not automatically improve comprehension, memory, or grades. Those outcomes depend on what you do with the notes: paraphrasing ideas, retrieving them without looking, explaining connections, solving problems, and applying concepts in new contexts.
When the Outline Method Works Best—and When It Does Not
Outline notes work best when the source has a discoverable verbal structure. They are less useful when relationships are spatial, comparative, mathematical, or highly nonlinear.
| Situation | Outline Fit | Why | Better Adjustment or Method |
|---|---|---|---|
| Clearly signposted lecture | Strong | Topics and subtopics arrive in order | Use provisional headings and indent details live |
| Structured textbook chapter | Strong | Headings can guide the hierarchy | Preview first, then paraphrase rather than copy |
| Recorded lecture or video | Strong | You can pause and repair structure | Add timestamps to difficult branches |
| Fast nonlinear discussion | Limited | Ideas change before hierarchy is clear | Capture sentence notes, then reorganize afterward |
| Comparison-heavy content | Limited | Nested bullets hide repeated dimensions | Use a chart with shared comparison columns |
| Anatomy, equations, or processes | Mixed | Words alone may hide spatial or procedural logic | Combine outline notes with diagrams and worked steps |
| Brainstorming or cross-topic relationships | Weak | One-parent hierarchy cannot show many connections well | Use a mind map or concept map |
The subject name alone does not decide the method. Biology definitions may fit an outline, while anatomy needs labeled drawings; economics theory may fit nested notes, while competing models may be clearer in a table.
Hybrid notes are often more realistic than a single pure method. Use an outline for the verbal explanation, then place a diagram, equation, chart, or annotated slide beside the branch that needs it.
Outline Method vs. Cornell Notes
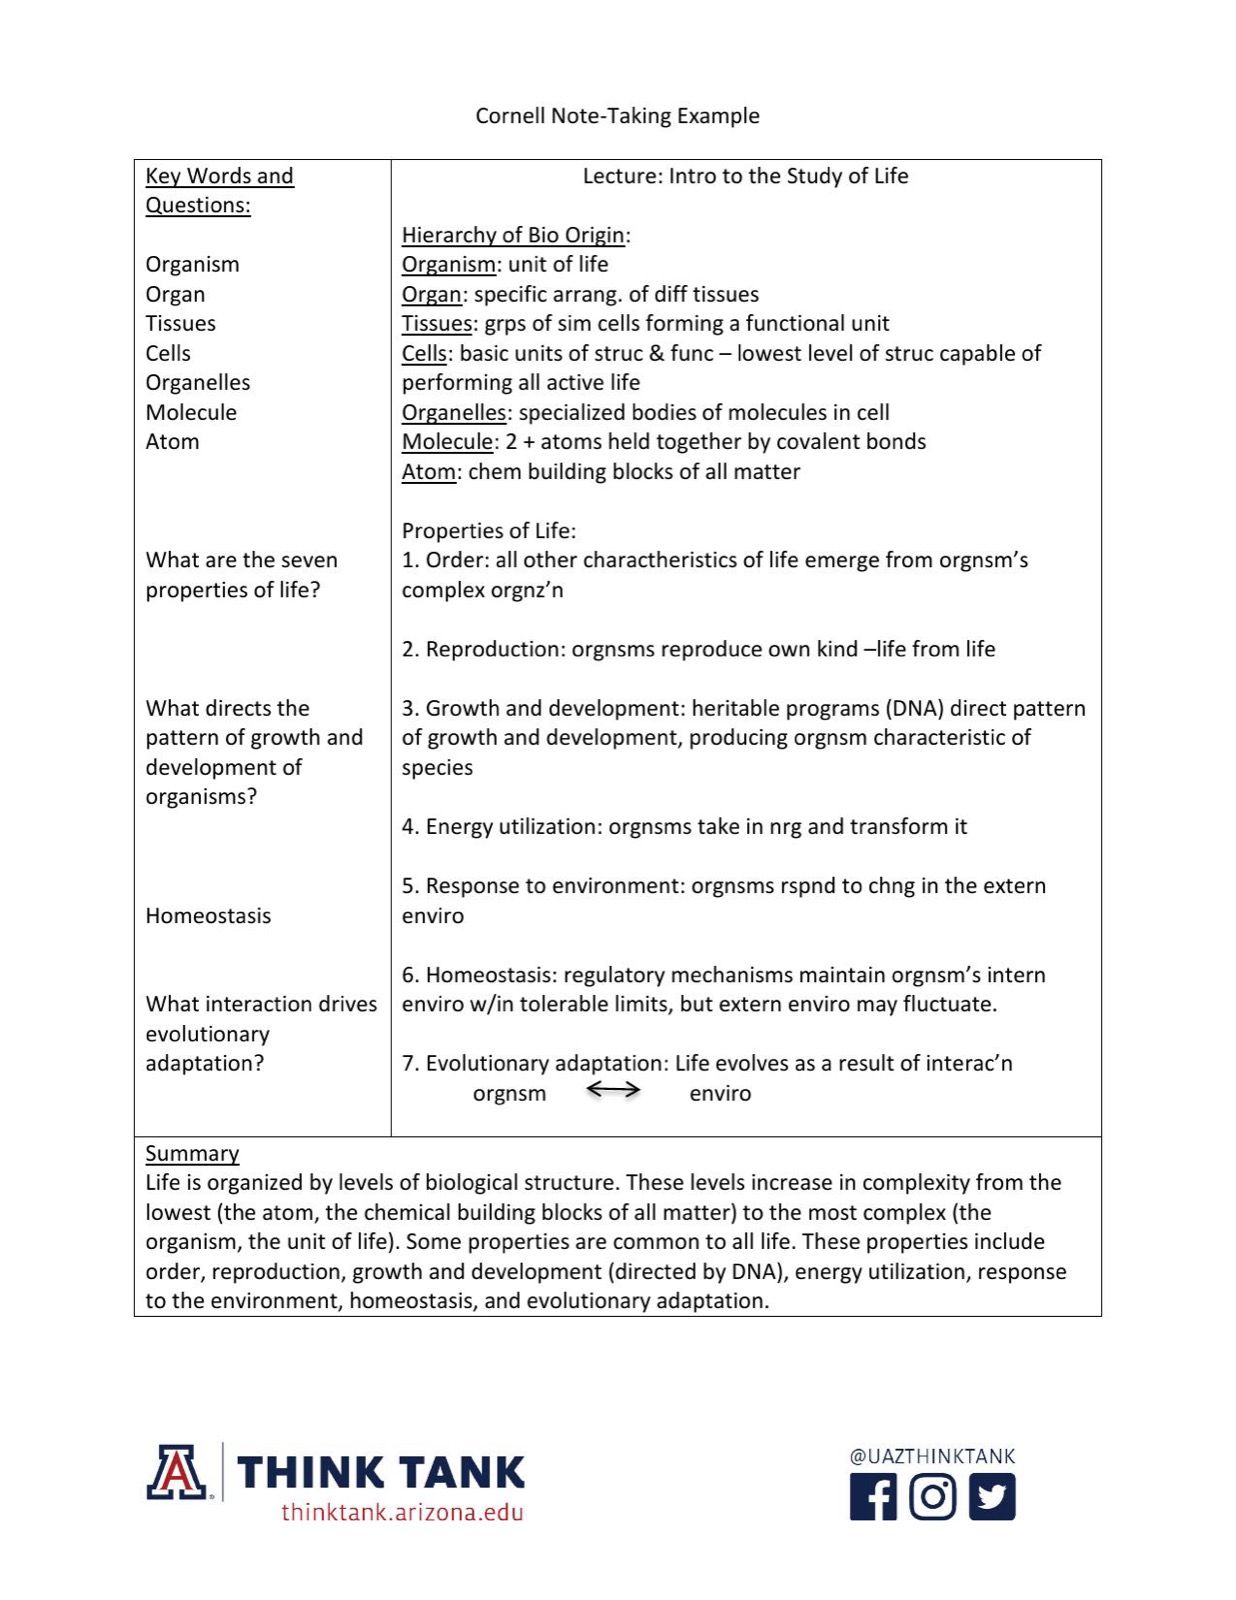
The outline method and Cornell notes solve related but different problems. Outlining primarily structures information during capture, while Cornell notes provide a page system for capture, cue creation, summarization, and later self-testing.
| Dimension | Outline Method | Cornell Notes |
|---|---|---|
| Page structure | One hierarchical body using indentation | Notes area, cue column, and bottom summary |
| Primary strength | Fast organization from general to specific | Built-in prompts for review and retrieval |
| Capture speed | Fast when the source is clearly structured | Moderate because the page has defined functions |
| Recall prompts | Not included automatically | Cue column is designed for questions and keywords |
| Post-class work | Repair hierarchy and add study prompts | Complete cues, summary, and review cycle |
| Best fit | Structured lectures, readings, and meeting topics | Material that needs repeated self-testing and synthesis |
Choose Outline for Fast Hierarchical Capture
Use outline notes when the speaker or source moves through distinct headings and supporting details. The format is especially efficient when you need to capture a lot of verbal information without drawing a specialized page layout.
Choose Cornell for a Built-In Review Cycle
Use Cornell notes when you want the page itself to remind you to create questions and write a synthesis. Cornell requires more post-class processing, but its cue column makes self-testing easier to begin.
Use an Outline Inside the Cornell Notes Column
You do not have to choose one system exclusively. Put hierarchical outline notes in the large right-hand notes area, write questions or key terms in the left cue column, and summarize the top-level branches at the bottom.
This hybrid fixes a common weakness in each method. The outline gives the Cornell notes area a clear internal structure, while Cornell adds recall prompts and synthesis that a plain outline lacks.
How to Turn Outline Notes Into Study Material
Outline notes are capture material until you actively work with them. Use the following process to convert a neat page into something that tests understanding.
Run the Parent-Child Check
Read each heading followed by its children. Every child should answer, explain, divide, support, or illustrate the parent; move any orphaned bullet to the branch where it belongs.
Collapse Details and Recall the Hidden Branch
Cover or collapse everything below one heading and explain the hidden points aloud. Reopen the branch, compare your explanation, and mark missing or confused ideas for another attempt.
Turn Headings Into Questions
Change “Types of Reinforcement” into “How do positive and negative reinforcement differ?” Questions create a retrieval task, while descriptive headings often invite passive rereading.
Write a Summary From the Top Two Levels
Use only the main topics and subtopics to write a short paragraph in your own words. Return to deeper details only when you need evidence, terminology, or an example.
Convert High-Value Details Into Practice
Create flashcards for precise definitions, formulas, sequences, or distinctions that require recall. For broader branches, use explanation prompts, comparison questions, or practice problems instead of breaking every sentence into a tiny card.
Create Structured Notes From Source Material With Lynote
When the source is too long to organize comfortably in one pass, Lynote AI Note Generator can turn documents, audio, video, images, webpages, or YouTube links into structured notes. The following workflow creates a first-pass note that you can reorganize with the outline method.
Step 1. Add the Source Material
Upload the relevant file or choose the matching URL input. If you paste a webpage URL, use Parse so Lynote can fetch the content; direct file uploads do not require that action.
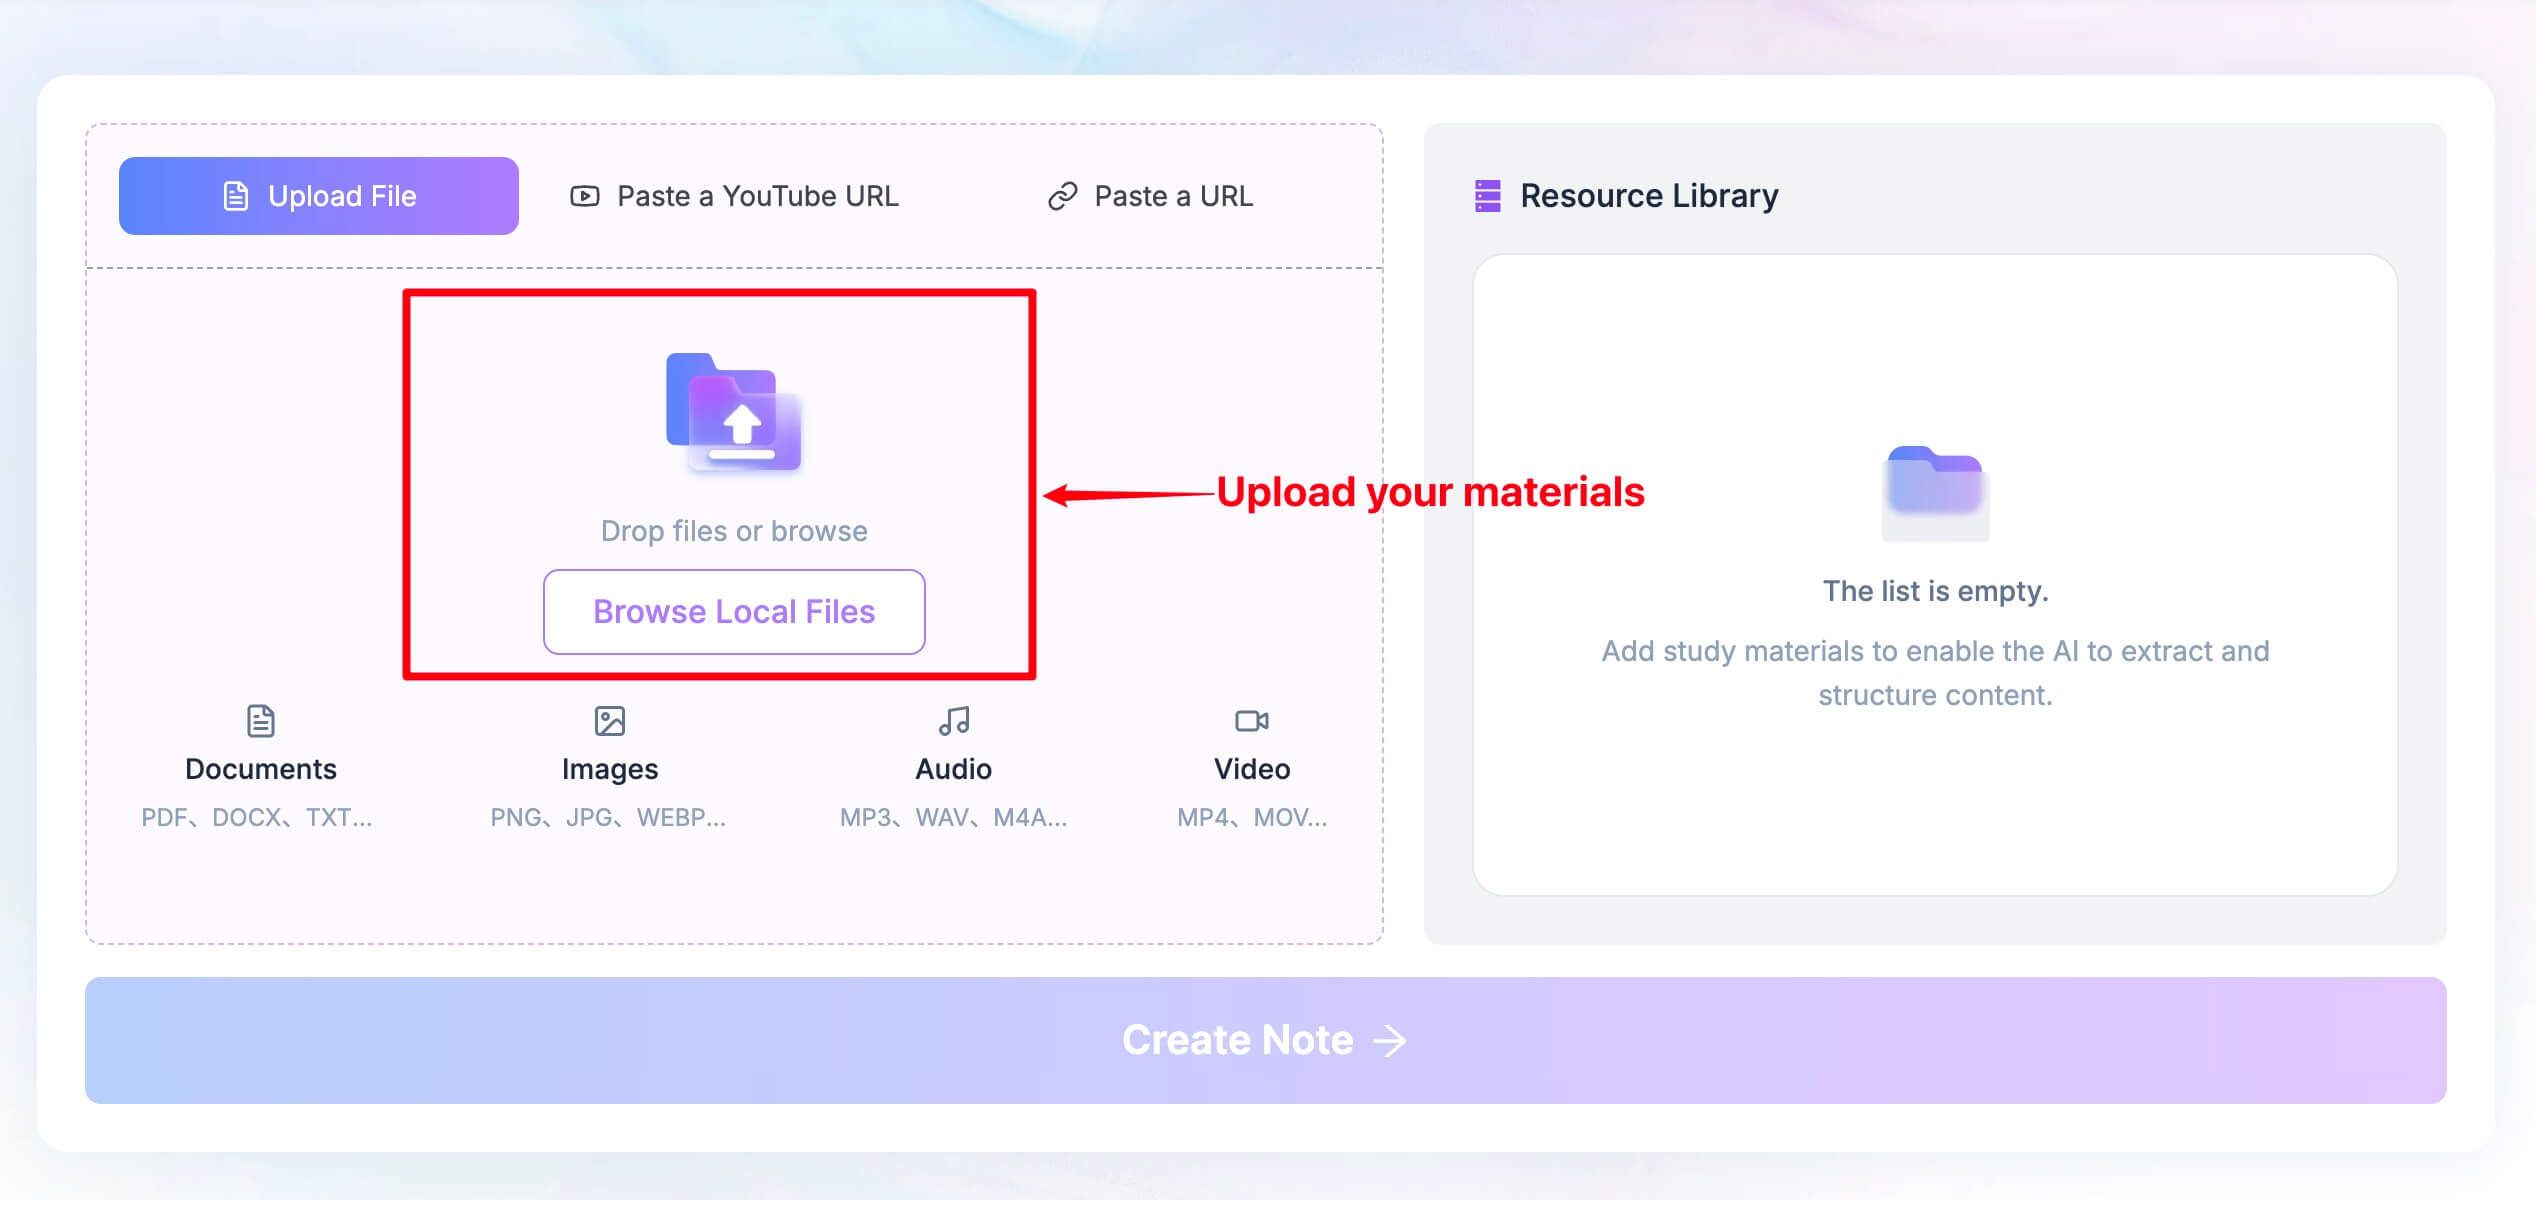
Step 2. Create the Note
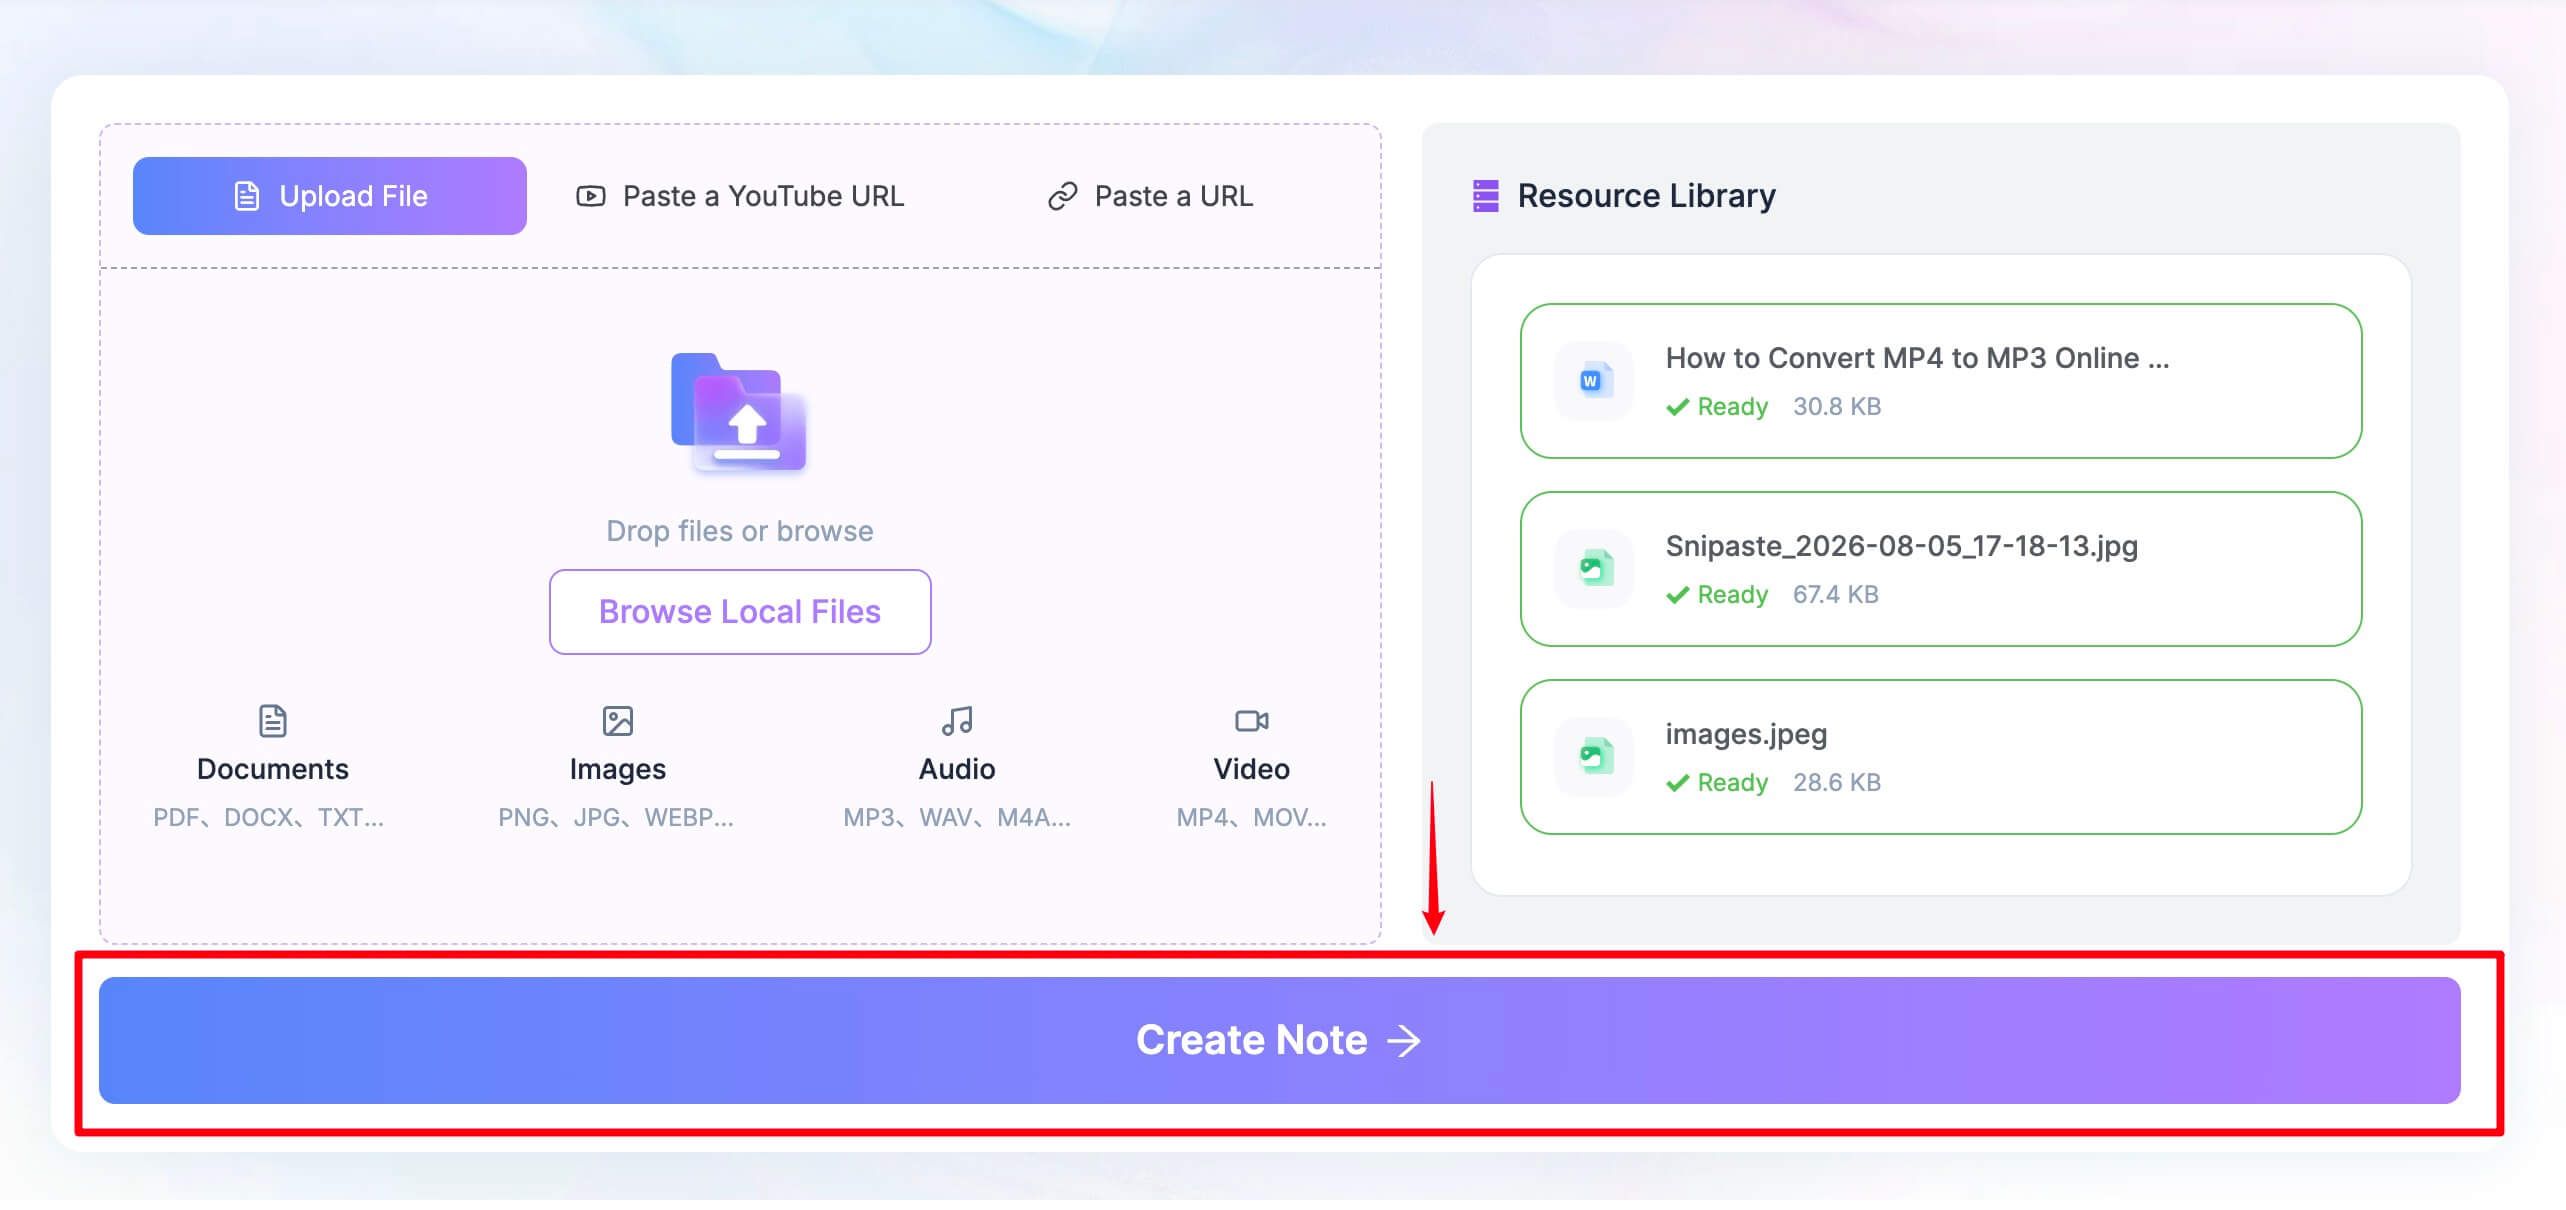
Wait until the source appears in the Resource Library, then select Create Note. Lynote processes the material and opens it in the note workspace with structured headings and bullet points.
Step 3. Review and Repair the Hierarchy
Read the generated note beside the source-based workspace and use follow-up questions when a branch is unclear. Check that every supporting point belongs under its parent before reusing the note for study.
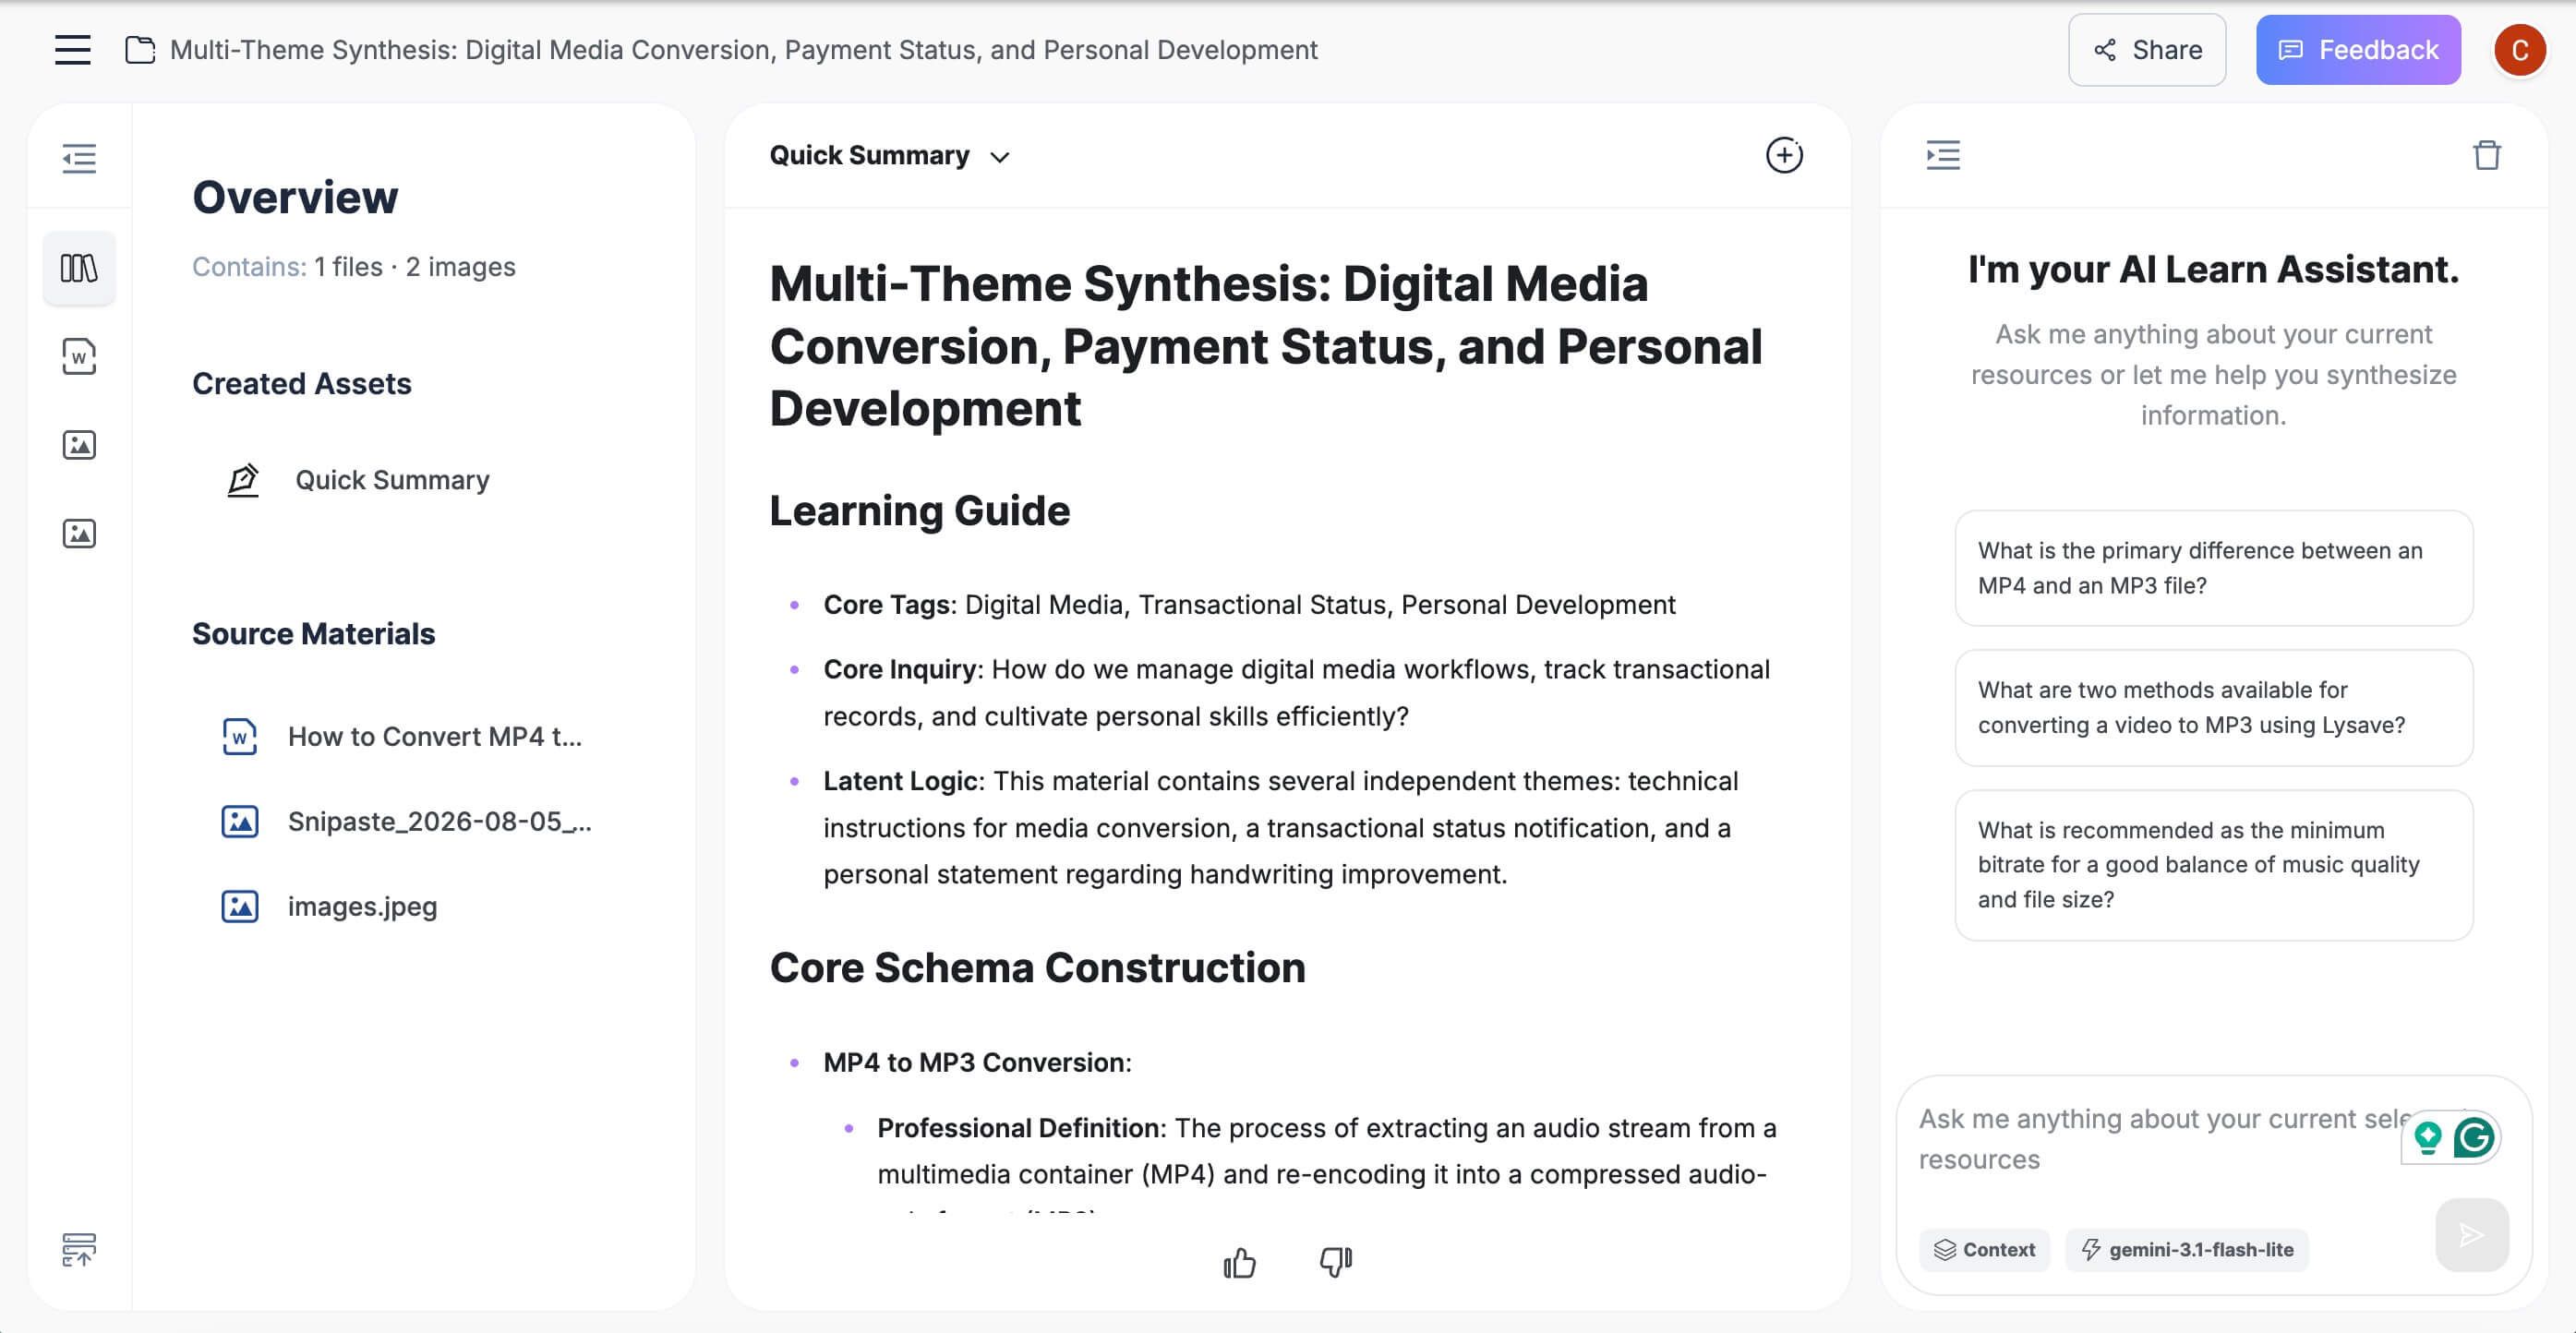
Treat that output as an editable first pass, not a finished learning hierarchy. Rename vague headings, merge repeated branches, move misplaced details, remove points that do not serve your purpose, and add examples or questions in your own words.
The same workspace supports follow-up questions about the source and can convert notes into flashcards. Use those options selectively: ask questions to resolve unclear branches, then create cards only for information that benefits from direct retrieval practice.
Common Outline Note-Taking Problems and Fixes
Most problems come from treating formatting as the goal. The repair is usually to simplify the hierarchy and make the relationship between each parent and child explicit.
| Problem | What Caused It | Fast Fix | Post-Class Fix |
|---|---|---|---|
| Every bullet is at the same level | Ideas were captured chronologically | Mark likely headings with a star | Group details under descriptive parents |
| Too many indentation levels | Every small detail became a new branch | Stop at three or four levels | Remove trivia and merge single-child branches |
| Lecturer changes direction | The hierarchy was assumed too early | Add ? and continue on a new line | Move the point once the relationship is clear |
| Notes contain full paragraphs | Capture became transcription | Switch to phrases and familiar symbols | Paraphrase each paragraph into one claim plus support |
| Outline hides comparisons | Each item has separate nested facts | Mark shared dimensions in the margin | Rebuild the section as a comparison chart |
| Notes look neat but are hard to remember | Review stayed passive | Turn one heading into a question | Add cues, summaries, flashcards, or practice problems |
Do not spend a live lecture fixing spacing while new information continues. A rough but complete capture can be reorganized; a beautiful page cannot recover an explanation you missed.
Copyable Outline Note-Taking Template
Choose the lightest template that shows the relationships you need. Consistency helps, but the content should control the number of levels.
Simple Lecture Template
Topic and date

* Main idea
  * Subtopic
    * Key explanation
    * Example or evidence
  * Subtopic
    * Key explanation
* New main idea
  * Subtopic
Alphanumeric Reading Template
I - Main section
  A - Subsection
    1 - Main claim
      a - Evidence or example
    2 - Qualification or limitation
  B - Subsection
II - Main section
Digital Collapsible Template
## Main topic
- Core explanation
  - Evidence/example:
  - Question to resolve:
  - Connection to another branch:
- Subtopic
  - Key detail:
  - Review prompt:
Before considering the notes complete, ask three questions: Can the top level summarize the source? Does every child clearly support its parent? Can you explain a collapsed branch without looking at its details?
FAQs About the Outline Note-Taking Method
What Is the Outline Method in Note Taking?
It is a hierarchical method that places main ideas at the left and indents related subtopics, supporting points, and examples to the right. The indentation shows how specific details depend on broader ideas.
What Are the Benefits of Outline Notes?
Outline notes make structure visible, encourage selective capture, simplify navigation, and expose gaps or misplaced details. They also provide useful material for summaries and review questions, although active study is still necessary for learning.
What Is an Example of the Outline Note-Taking Method?
A biology outline might place “Cellular Respiration” at the top, “Glycolysis” beneath it, “Location” and “Outputs” beneath glycolysis, and the specific molecules or ATP count as deeper details. Each indentation answers a more specific question about its parent.
Is the Outline Method Good for Lectures?
Yes, when the lecture has clear topics and supporting points. For a very fast or nonlinear lecture, capture short sentence notes first and organize them into an outline afterward.
What Subjects Are Best for Outline Notes?
They work well for structured verbal material in subjects such as history, psychology, social science, and concept-heavy science chapters. Visual systems, equations, processes, and comparisons often need diagrams, worked examples, or charts alongside the outline.
What Is the Difference Between Outline Notes and Cornell Notes?
Outline notes organize content through indentation. Cornell notes divide the page into notes, cues, and a summary, creating a built-in review structure.
Can I Combine Cornell Notes With the Outline Method?
Yes. Write an outline in the main Cornell notes area, put questions and keywords in the cue column, and synthesize the major branches in the bottom summary.
Should Outline Notes Use Bullets, Numbers, or Roman Numerals?
Any consistent notation works. Bullets are fast for live capture, while numbers or Roman numerals can make formal reading notes easier to reference; accurate hierarchy matters more than the symbol system.
Final Takeaway
The outline method works because it makes you show how details belong to larger ideas. Capture that hierarchy provisionally, repair it while the source is fresh, and then activate the notes through questions, recall, explanation, and application.
Use another format or a hybrid when the material is visual, comparative, or nonlinear. The strongest outline is not the one with the neatest indentation; it is the one that helps you reconstruct and use the ideas without depending on the original source.

Written by Janet L. Harris
AI Writing Specialist
Janet reviews AI detectors and humanization tools, with a focus on accuracy, limitations, and responsible use. View all articles →